Sunday 29 September 2019

Forever Love | Pretty Little Studio

For Pretty Little Studio's blog I created this boy layout using with the beautiful “With All My Heart” collection. I love the soft colors and wonderful designs in this collection and often reach for it when scrapping photos of my daughter. However, when I saw this photo of my oldest son (with all the blue colors) taken during our vacation in Greece last month, I decided to give it a try. I really love how it turned out!

Here’s the layout I made:


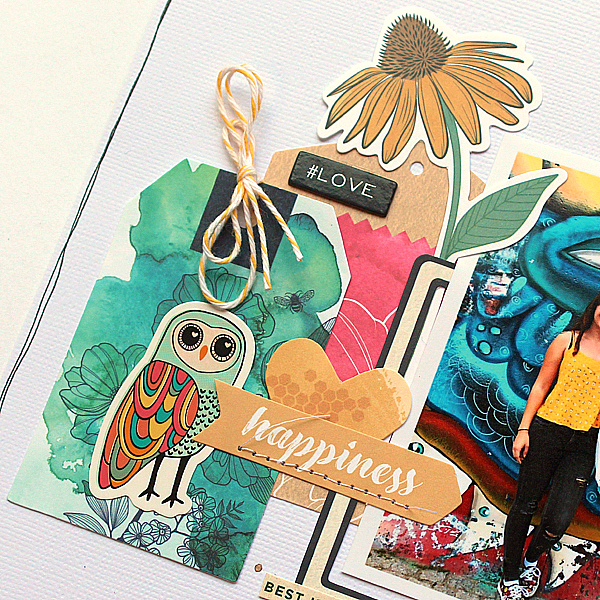
I matted the photo on a metallic clear sheet with gold flower accents and matted that on a strip of patterned paper. I added a 3×4 journaling card on the right side and added a little tag partly below the card on the right side. On top I adhered a flair button with a cute little camera with a heart in the centre and a little word sticker:


Over the photo I added the title. The word “LOVE” is a cut file from JustNick Studio (Free Love) and the word “forever” is a Pretty Little Studio die-cut. Below the title I stamped the date, added a cardstock word from a “cut apart” strip of words and another word sticker.


Above the photo I added two large tags, a little tab and another word sticker:


With the addition of a few drops of color mist and some machine stitching my layout was done! Hope you like it!

Here’s a list of all the Pretty Little Studio products I used: With All My Heart collection: 8×8 Paper Pack; Metallic Clear: Lovely Gold; Frames: Flutter; Die-Cuts: Forever; Flair Buttons: Love Always; 3×4 Journaling Cards: Snap Shot; Stickers: Lovely Story Words; Tags: Sweetheart.

Thank you so much for stopping by our blog today! I hope I’ve been able to inspire you to get out your stash of Pretty Little Studio products and start scrapping!


Saturday 28 September 2019

Star Player | JustNick | Doodlebug Design

For JustNick Studio I created this layout about my soccer playing son. Last season his team became champion, and the photos of that accomplishment had to be scrapped of course. I used the "Star Cluster" cut file as my son and his team mates were the stars of the season!

Here's the layout I created:


and this is the "Star Cluster" cut file I used:


For this cut file I decided to use a strip of three small photos rather than one large photo and I really love the result.

The papers and embellishments I used are Doodlebug's "French Kiss" collection. I love the red, blue and pink color combination!

Here are a few close-ups:


To add a bit of extra color to my page, I adhered little enamel hearts to the centre of all stars.


I remember when I just started scrapbooking I almost never added journaling to my layouts. Looking through my albums from that early period I really regret that. So now I make sure to always add a bit of journaling, whether it's at the front of my layout or at the back. It adds so much and it's so easy to do.

And here's already the last close-up:


This is it. Thank you so much for stopping by my blog today. Don't forget to check out all the awesome cut files Nicole has in her JustNick store!

Wishing you a fab weekend!
xoxo


Wednesday 18 September 2019

Make Today So Awesome | My Creative Scrapbook Step-By_Step | Vicki Boutin

Hello friends, today I want to share one of the layouts I created with the My Creative Scrapbook September Main kit. This colorful kit is filled with lots of product from the Wildflower & Honey collection from Vicki Boutin and also some papers from her Field Notes collection.

Here's the layout I made:


A colorful photo for a colorful kit!!

Here's a little step-by-step how I created my page. When I got started, I got out the entire kit:


but in the end I decided I didn't want to use the papers, but only the die-cuts, the stickers and the cardstock packaging from the die-cuts:


From the die-cuts I chose four of the tags, a frame and a few other bits and pieces:


I arranged the tags and the cardstock packaging on a white cardstock sheet:


Next came three more die-cuts: a frame, a journaling card with tab and another little card:


Behind the photo I adhered the "today" card and placed this over the frame and packaging:


With the addition of a flower, flag, circle and little bee die-cut my page looked like this:


Included in the kit are these sheets with chipboards. I totally adore these and chose a couple of them for my layout.


Except for adhesive chipboards there also some fun stickers in the kit and those came next, like this cute little owl:


Using an American Crafts precision pen 03 I drew a double line around the layout. Last but not least I added a few paint drops and some machine stitching.


Here are a few more close-ups of some of the details:


Thank you so much for visiting my blog! I hope I've been able to inspire you a little bit!

For more information about this kit (and the other 3 kits of this month) please visit the My Creative Scrapbook website and if you want to see the photos of all projects created by the design team with the various kits, please visit the Design Team Gallery.

Here's the photo of the September Main Kit I used:


Thanks again for stopping by! Wishing you happy crafting!
xoxo

Wednesday 11 September 2019

Pretty Little Studio | XOXO | Hey, I Love You

Hello friends, I've got some fun news which I've been dying to share! As of September I'm back on the Design Team of Pretty Little Studio! I've been away for two years and I really missed PLS and all it's awesome products and now I couldn't be happier to be back!

For my first blog post I used the XOXO collection designed by Heather to create this layout about the four very favorite people in my life: my husband and our three kids. The colors of this collection were just perfect for this photo so the choice was easy.

Here's the page I created:


I started my page by spraying the white cardstock background with Distress Oxide Spray "Spun Sugar" and quickly dried it with my heat tool. As I really don't like it when my paper warps I adhered the white cardstock on another sheet of cardstock, but this time a light pink one. 

Next I cut a large flower cut file from JustNick from a sheet of white cardstock (using my Silhouette Cameo) and sprayed it with Heidi Swapp "citron" spray ink. I'm so happy this ink color is an almost exact match for the green color in the collection. 


I matted the photo on three sheets of patterned paper: XOXO: Love Blooms, Forever and Hugs & Kisses and placed this partly on the flower cut file. On the left side of the photo I added a 3x4 journaling card from the "Love This" package and the word "Hey" from the "Hello Lovely Words" die-cuts. The green "love this moment" die-cut and the red "love" word are both from the "XOXO" die-cut package. The "Happy Life" flag is from the "Perfect Match" cut-aparts sheet.


All the flower die-cuts are from the "Blooming Love" package. I totally adore these flowers, so I placed them all over my layout. 

At the top of my photo I added two die-cuts from the "Love You" package: the three hearts in a row and the red word tab. 


The flair buttons are probably my favorite products in the Pretty Little Studio store. I use them on almost all of my layouts! This one is from the "Together" package. 


For the finishing touch I added lots of machine stitching. For me, a layout isn't finished when there's no stitching on it!

This is it! I hope you like it! I can't wait to share my next layout with you! Thank you so much for stopping by to take a look. 

Here’s a list of all the Pretty Little Studio products I used: XOXO collection: 8x8 paper pack; die-cuts: blooming love, Love You, XOXO, Hello Lovely Words; flair buttons: Together; 3x4 Journaling Cards: Love This; Cut-Aparts: Perfect Match Word Flags.


Sunday 8 September 2019

EXPLORE - JustNick Studio & Doodlebug Design

Last week on JustNick's blog we were using "words" from the JustNick store on our projects and I knew straight away which word I wanted to use. I just love those large words where you can fill the separate letters with various patterned papers, so I chose the word "explore", which was added to the store only last month.

This is the layout I made:


My husband and oldest son went to Spain on a one week vacation, just the two of them and had a great time together. When I waved them goodbye I made them promise to take some photos for me to scrap and that's what they did!

And these are the cut files I used: "Explore"


and "Summer":


The word "summer" at the bottom was just perfect to place over the word "Explore".

One of the dilemmas I have when using a large word cut file, is what size photos to use and where to place them. In this case I decided one a vertical photo strip with three small photos. I really love how this turned out! 

To scrap my page I used the new "I Heart Travel" collection from Doodlebug Design I had just bought. I really love how I was able to use all the collection's fun patterned papers to fill the letters.

Here are a few close-ups of my layout:


How I love these large word cut files! I hope I've been able to inspire you to give them a try too, if you haven't already done that. Check them out in the JustNick store here.

Thank you so much for stopping by my blog today! Wishing you happy scrapping!
xoxo

Saturday 7 September 2019

September Main Kit from My Creative Scrapbook & A Layout!

Hello everyone, it's time to show you the September Main Kit from My Creative Scrapbook. The kit contains a lot of products from American Crafts/Vicki Boutin, mostly from the Wildflower & Honey collection, but also some from the Field Notes collection.

Here's one of the pages I made:


I really love the vibrant colors of this kit! They were just perfect for these fun photos of my daughter participating in a kind of "toilet" race. 

Here are a couple of close-ups: 


And this is the photo of this month's Main kit:


You can find more information about this fun kit on the website of My Creative Scrapbook. If you want to see the other three September kits please check the MCS blog

Thank you so much for visiting my blog! 
xoxo

Tuesday 3 September 2019

My Creative Scrapbook August Creative Kit Step-By-Step | Pebbles Inc

Hi friends, today I'm sharing one of the layouts I created with the fun August Creative kit from My Creative Scrapbook. I really loved this kit, filled with the "Oh Summertime" collection from Pebbles Inc.

Here's the layout I made:


The photo I used is from our summer vacation in the south of France two years ago. I just love that this kit is also perfect to scrap boys photos!

Here's another little step-by-step of how I created this layout. I arranged everything I thought I would need on my desk:


I chose a sheet of white American Crafts cardstock for the background and selected the die cuts with a straight left side.


Next I adhered the die cuts with the straight sides on the left side of my background:


When I was happy how it looked I filled the gaps with other die cuts, such as the lemon, the sun, the flip flops and the boys:


I found the white background too white so I decided to add a little color. I selected a yellow ink pad and used a piece of packaging plastic to transfer the ink from the ink pad on to my paper:


Now it was time to arrange the photos on my layout. First I adhered them on a piece of patterned paper and then I added a few die cuts and only then did I place this cluster on my layout:


For the title I used the blue glitter Thickers that were included in the kit. Below the title I wrote a bit of journaling:


After adding some machine stitching and stamping the date I was done! Hope you like it! Here are a few close-ups of the finished page:


For more information about this kit (and the other 3 kits of this month) please visit the My Creative Scrapbook web site. For photos of all projects created by the design team with the various kit, please visit the Design Team Gallery.

Here's the photo of the August Creative Kit I used:


Thank you so much for stopping by my blog! I really appreciate it! Wishing you happy crafting!
xoxo