Contents

Friday, 30 June 2017

BDAY fun - My Creative Scrapbook Sketch

Good morning friends! As it's almost time for the new July kit from My Creative Scrapbook I thought I would share the 4th and last layout I created with the June Main Kit! For this page I used the MCS sketch.


Both my husband and my oldest son have their birthdays in May (just 1 day apart) and as this kit can so easily be used for boys pages I thought I would create a layout with the photos of their birthdays. Here are a few close-ups:


And this is the sketch we used. Fun right?!


As the sketch challenge is undergoing a bit of a change there's no challenge this month, but of course you can still use the sketch if you like it! 

For more MCS kit inspiration please hop over to the DT gallery or for more information about the kits have a look at the website

Thanks for stopping by my blog again! Have a fab day!
xxx
Monique

Friday, 23 June 2017

Last layout for The Cut Shoppe - Away We Go!

Today I'm sharing the last layout I created as a member of The Cut Shoppe Design Team. Sadly the design team will be finishing at the end of this month. I can't believe how fast this year went! I've had the time of my life and am so grateful to Ashley for having me on her team and letting me play with all of her fun cut files!

For today's layout I thought it would be a good idea to use my favorite cut file once more: the "All Heart" cut file! 

Here's what I created with it, also using Crate Paper's Oasis collection: 
  

and here's the "All Heart" cut file I used:


I so love this cut file! and although I've used the cut file a few times before the layouts always turn out totally different! Here are a couple of close-ups ... as you can see I've adhered the title in the large hearts and filled all the empty hearts (large and small) with enamel hearts. 


Isn't the puffy flamingo the best?!! 


And if you're curious about the other layouts I created with this cut file, here are two of them: one I created for Doodlebug:


and one I created for Pretty Little Studio:


It's only now that I notice all the pinks in my pages! Must be because of all the hearts, lol. 

Now, if you're looking for this cut file or any other cut file with hearts just check The Cut Shoppe Etsy Store! There are so many fun designs and products available at the store.

Thank you so much for stopping by my blog today!

Hugs,
Monique


Monday, 19 June 2017

Father's Day (Wine) Bottle Tags - Pebbles

Hi friends! Today I want to share this simple Father’s Day project I created for Pebbles with you! As both my hubby and my love a good wine the kids and I decided to give them both a bottle of good wine. Of course these bottles need a little decoration, and what is more fun than creating Father’s Day Wine Bottle Tags, including a pocket for an extra gift card or a card with a sweet message?! I decided to use the stunning Pebbles Simple Life collection from Jen Hadfield. Although this collection definitely has a feminine touch with the elegant flower die-cuts and stickers, I think it’s also perfect to use for men’s projects; the quiet neutral and earthy colors are just what I look for when creating a project for a man.

Here’s a photo of the Father’s Day Wine Bottle Tags I created:


As there’s still a little time to create these Father’s Day Wine Bottle Tags yourself, I’ll show you quickly how I created them.

I started with a cut file from the Silhouette store, but if you don’t own an electronic die-cutting machine these are easy to create without it as well. After cutting the base for the Father’s Day Wine Bottle Tags from two different colored sheets of cardstock, I collected the items I thought I would need to create my Father’s Day Wine Bottle Tags:


For the inside of the brown tag I chose the Poppies and the Garden Tools patterned papers:


And for the front of the pocket I chose the Barn Wood patterned paper:


Before embellishing the tags I doodled a line around the sides of the patterned paper with a black precision pen. Next, I selected a sticker from the “Sentiments” cardstock stickers and a die-cut of a bunch of flowers:


The following step is selecting a word sticker, a wood veneer butterfly and forming the word “DAD” using matching American Crafts Thickers. To adhere the wood veneer butterfly I used 3D foam adhesive to create a little “depth”:


And tada! Here’s (one of) the finished Father’s Day Wine Bottle Tag:


The second Father’s Day Wine Bottle Tag turned out like this:


Both tags measure 3.5″ x 8.5″ and have a score & fold line at 3″ from the top. They fit around a wine bottle perfectly! Look:


I really love how this turned out and better yet, the recipients loved them too!!

Thanks for stopping by to have a look at my project. If you want to study the list with supplies I used then please hop over to Pebbles' blog where I added the complete list!

xoxo
Monique

Saturday, 17 June 2017

We Love BBQ - Step-By-Step Tutorial for My Creative Scrapbook

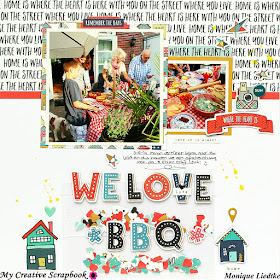
Hey friends! Today I'm sharing the step-by-step tut I created for My Creative Scrapbook for the hearts confetti pocket on my "We Love BBQ" layout. I used the fabulous June Main Kit  from My Creative Scrapbook to scrap this page and I adore the Fancy Pants Family & Co collection that is featured in this kit. This collection is so versatile and can be used to scrap so many normal "everyday" kind of photos!

Here's the "We Love BBQ" layout and I created the step-by-step tutorial mainly for the pocket with the hearts confetti behind the title.


So here's what I did. I got my June Main Kit ready on my scrap table:


and chose a 6" x 6" page protector from my stash. I used my paper trimmer to cut off the left side with the holes: 


Next I use a little heart punch to punch a whole lot of hearts the size of confetti from a few different papers:


The little hearts went into the clear page protector:


Using my sewing machine I sewed the pocket (page protector) closed like this:


I filled the pocket a second time with the little hearts and sewed it closed once again. The two rows are about 1.5" high. I cut off the excess pocket at the top. 


Using the chipboard letters from the June Main Kit I created the title and adhered this on top of the hearts confetti pocket: 


Now I just had to decide where to place this hearts confetti pocket and played around with it until I found just the right spot:


After deciding on the general look of my layout the rest was easy! Here are a few close-up photos of the finished layout:


I adore the little words in the packet of  Fancy Pants die-cuts and knew I wanted to add one to the title. The FP puffy heart sticker was the perfect finishing touch! 


I love that there are so many fun embellishments in this kit (like the die-cuts, chipboard pieces & (puffy) stickers) as I love creating "busy" pages and always want to add lots of bits and pieces to my projects. 


After adding a few lines of handwritten journaling and a couple of drops of yellow color mist I was done! Can't wait to hear what you think! 


Thank you so much for stopping by my blog today! If you want to learn more about the MCS June Main Kit then please hop over to the "Kit Club" part of the website! Wishing you a wonderful day! 

xoxo Monique

Thursday, 15 June 2017

Stuck?! Sketches Mid June Reveal

Hi everyone! It's time for a new sketch at Stuck?! Sketches! This time it's a sketch for just one photo. Because I still had the Chasing Dreams collection from Maggie Holmes on my desk from the last layout I created I decided to use it for this page as well. 

Here's what I did:


Although I'm a huge fan of bold & bright colors I love the soft colors in this collection a lot! I guess loving the one doesn't mean you can't love the other as well. 

Here are a few close-ups: 


And this is the sketch Laura designed for us:


Isn't it a fun one?! I hope you decide to join in and use it for one of your next projects!! If you do you might be the winner of one of the prizes we got this month. These are the sponsors for this challenge:

ScrapMatts are offering two large pieces of chipboard to one lucky participant for this challenge!

 and Lindy's Stamp Gang is sponsoring this challenge with a $25.00 gift certificate to their online shop for a second lucky participant.

Please link up your layouts over in the sidebar on the blog of Stuck?! Sketches by June 29th, 2017 at midnight EST to be in the running for one of our prizes! All prizes will be drawn randomly using Random.org to pick a number! 

Thanks for taking the time to stop by and wishing you a fabulous day!
xoxo
Monique

Tuesday, 13 June 2017

Chasing Dreams - The Cut Shoppe & Crate Paper

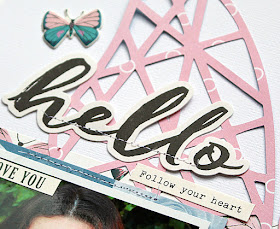
Hello friends! Today I'm sharing the layout I created for The Cut Shoppe with their Love Everlasting cut file. When I got started on my layout I knew I wanted to use the Chasing Dreams collection from Crate Paper and then I remembered this cut file of the butterfly I downloaded for free (!) from The Cut Shoppe's blog (May 12, 2016) and I just knew it would be perfect! Here's what I did:


And this is the FREE cut file I used: Love Everlasting


I totally adore the butterfly cut file and am so glad I thought of it! The fringe butterfly from the Chasing Dreams collection looks great adhered on top of it. 


Here are a few more close-ups of my layout:


If you love the Love Everlasting cut file too then I've got good news for you: it's still available for FREE! Just hop over to this blog post from May 2016 and follow the directions! 

Of course you can find lots of other fabulous cut files in The Cut Shoppe's Etsy Store

This is it! Thank you so much for stopping by my blog today! Wishing you a wonderful day!
xoxo
Monique