Contents

Wednesday, 29 April 2020

Oh What Fun | Pretty Little Studio

Hello friends! Today I'm sharing another layout created for Pretty Little Studio using their Color Me Happy collection. I adore the bright colors in this collection and every time I see this collection lying on my desk it calls out to me! So I just needed to use it again! Here’s what I created for today:


Apart from the Color Me Happy collection I also used a Pretty Little Studio cut file. I thought this title was very appropriate for this collection. I cut it from a sheet of white cardstock and spray inked it yellow. The rainbow in the bottom right corner was hand cut from the 8″ x 8″ sheet called “Rainbow Connection“. After I glued it in place I placed the cut file over it and used my sewing machine to stitch that in place. Love how that looks!

Next I created three little clusters: one at the top left corner of my page:


Another cluster in the middle, on the right side:


And one cluster in the bottom left corner:


I soooo adore all those happy faces in the die-cuts! So super cute!! Like this little mouse … how cute!


This is definitely one of my favorite collections from Pretty Little Studio!

Here’s a list of what I used for my layout: Color Me Happy collection: 12 x 12 paper pack, 8 x 8 paper pack; Die-Cuts: Stay True Words, Over The Rainbow, Merry Go Round, Hear Me Roar; Word Flags: Wild At Heart; Stickers: Lucky Stars. Digital Cut File: Oh What Fun.

This is it for today. Thank you so much for stopping by to take a peek at my page. Don’t forget to check out the Color Me Happy collection in the Pretty Little Studio store! You’ll be amazed when you see how many items there are in this collection! Wishing you a happy day and stay safe wherever you are!


Friday, 24 April 2020

It's Springtime! | JustNick & Doodlebug Design

Hello friends! How are you all doing? I hope you're doing fine where ever you are! Today I'm sharing my latest JustNick layout with you. I created this fun and colorful page with one of the new Easter cut files called "Easter Egg Background" and some Doodlebug goodies.


and this is the cut file I used:


What I love about this cut file is that it's filled with many wonderful flowers which I backed with 9 or 10 different patterned papers. I used the 6" x 6" double sided paper pad from Doodlebug's Simply Spring collection for this and love the result.


Look how great these papers look behind this cut file! When I was finished adhering all the different papers behind the cut file I chose a tangerine colored cardstock paper for the background and only then did I decide on which photos & embellishments to use.


Obviously the photo(s) had to be from Easter or right before or after Easter. These photos were taken the day before Easter, when my bff (in the front of the photo) came over for a quick coffee. We hadn't seen each other for almost 5 weeks, which is quite a long time for us, and we really needed to catch up. So, because of the Corona virus, we sat outside on my garden wall, with one and a half meter between us, drinking coffee and talking a lot. Because of the beautiful weather (and the magnificent blooming tree in my front garden) we had a great time (although the situation remained really surreal).


Choosing embellishments wasn't very hard as Doodlebug's collection come with o many die-cuts and stickers, and look at the awesome sheep!


Next I wrote my journaling around the edge of the Easter egg and machine stitched around the edges of the background paper and here and there on my layout.


I really love the result. This cut file is so super cute and just perfect for this Spring collection from Doodlebug. Make sure to hop over to the store to grab this cut file or one of the many many others!

Thank you so much for stopping by to have a look at what I made. Have a great week and please stay safe!

Hugs,


Tuesday, 21 April 2020

What a wonderful world | Step-by-step My Creative Scrapbook April Kit

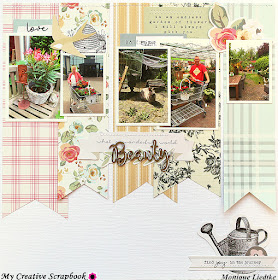
Hello friends! Today I'm sharing the step-by-step I made for My Creative Scrapbook using one of the layouts I made with the April Main Kit. I love all the My Mind's Eye "Gingham Garden" products in this kit! The garden photos I had just printed were perfect for this kit! Here's the layout I made:


And here's a quick walk through how I created this layout. 

As I always do, I started with displaying the contents of the entire kit on my table, so I could easily choose what I wanted to use:


I chose the photos I wanted to scrap and selected the papers to go with them. I had a hard time choosing the papers, as they are double-sided and I loved all of the sides!! In the end I went with these: 


For the background I chose a sheet of white cardstock from my stash. I cut 5 strips from the patterned papers I had chosen, varying in width from 5.5 cm to 7 cm. At the bottom of each strip of paper I cut a large "V". Only then did I decide on the length of the strips, which varied from 22 to 24 cm. 


Next I placed my photos on the strips, about 2.5 - 4 cm from the top. 


Next I chose embellishments to adhere above the photos: 


I placed a large banner die-cut below the photo in the middle, placed a die-cut with leaves over the bottom and a wood veneer word on top. 


A little cluster of 3 die-cuts were adhered in the bottom right corner of my layout:


Of course I did some machine stitching on my layout, because that's what I do.


Last but not least I drew a few lines on the wood veneer word, using a white Sharpy and my page was done!


Here are a few more close-ups:


Don't you just love the soft colors of this kit? I always tend to reach for brightly colored papers and love it that kits sometimes force you to step out of your comfort zone. 

For more information about this kit (and the other 3 kits of this month) please visit the My Creative Scrapbook website and if you want to see the photos of all projects created by the design team with the various kits, please visit the Design Team Gallery.

Here's the photo of the kit: 


Thank you so much for stopping by today! Wishing you happy crafting!
xxx 

Friday, 17 April 2020

Pretty | JustNick Studio & Felicity Jane

Hi friends, today I'm sharing my latest JustNick layout using the beautiful "Spring Florals 2" cut file and the Brie collection from Felicity Jane.


And this is the cut file I used:


Don't you agree it's awesome?! I adore it! I decided to cut this cut file from a sheet of white cardstock and leave it as it is. For the background of I used a sheet of "mustard" colored paper with white horizontal stripes and I think the stem with the flowers look great on top of this.

This time I chose to use two small (Polaroid) photos, sized 6 cm x 9 cm and placed these on the right side of the stem of the flower.


On the left side of the stem I added a few die-cuts, like the girl die-cut, because she looks a bit like my daughter. At the bottom of the stem I adhered a pretty striped bow.


Below the photos I wrote a few lines of journaling and above the photos I added the title, a few extra embellishments and three fabric flags at the top of the page.


Of course I added a bit of machine stitching and a few drops of white paint. I love how this turned out.


Have you seen how many new cut files have been added to the store? It's worth your while to go and have a look!

Thank you so much for stopping by today. I hope you and yours are all well & safe and that maybe you'll have some time to yourself to scrap!

xoxo
Monique