Tuesday, 20 July 2021

Goal Getter | Step-By-Step My Creative Scrapbook | July Creative Kit

Hello friends! Today I'm sharing my step-by-step for this layout I created for My Creative Scrapbook using the July Creative kit. 

I wanted to scrap these two photos of my youngest son and because of the bright colors of his shirt this kit was absolutely perfect! 

This is the layout I created:


First I displayed the kit on my scrap table:


Next I decided on a "round" design and therefore needed something round to trace and found this plate:


I traced the plate with a pencil and cut out the circle, which I then placed on a sheet of white cardstock:


Next I cut three rectangles and placed these on top of the circle:


Next up were the fabulous puffy words:


These words were perfect to arrange around the circle:


I decided I wanted a patterned paper below the white cardstock, so I cut off approx. 1 cm on all sides and adhered the cardstock on a sheet of light blue pattered paper, called "April Showers". 

Of course the layout needed some machine stitching: 


I stitched both on the patterned papers as well on all 4 sides of the layout:


Next I placed the two photos on the rectangles in the middle of the circle. I wrote some journaling beneath and added a couple of die-cuts & stickers (which I changed again later-on):


After adding a few drops of paint I was done! Hope you like it! 

Here are a couple of close-up shots:


For more information about this kit (and the other 3 kits of this month) please visit the My Creative Scrapbook website and if you want to see the photos of all projects created by the design team with the various kits, please visit the Design Team Gallery.

July Creative Kit:


Wishing you a wonderful day! 

xxx Monique

Tuesday, 13 July 2021

LOVE THIS | Pretty Little Studio

Hello friends! I created this layout of my 3 kids for Pretty Little Studio's blog using the "Grateful Heart" collection. For this layout I chose the 12x12 "Grace" paper for the background as I just love the paint at the top of the page! 

Here's what I made:

I matted my photo on three different papers and added a strip of 3 vertical hearts at the right side and a whole sheet of cut-outs. 

On the left side I used a part of the packaging because I just loved the design!

And in the left bottom corner of the photo I adhered a flair button and some word stickers. 

On the right side of the photo I created a little cluster using one of the beautiful flower die-cuts, a striped tag, a word sticker and the die-cut of the camera:

I also placed one of the 3x4 journaling cards on the right side of the strip of cut-outs. I chose my favorite with the metallic words "Love this" (I wanted to show you the metallic sheen, but it was a bit hard to take a good photo of it):


At the bottom of my layout I added a strip of torn paper and two die-cuts: a strip of hearts and a vase with some flowers (love these!): 


After adding a few drops of paint and some machine stitching along the edges of my layout and on the journaling card and some of the die-cuts I was done! 

Hope you like it! 

Thank you so much for stopping by! Don't forget to visit the Pretty Little Studio shop for this collection or one of the many other collections. 

Here's a list of the PLS products I used:

Grateful Heart collection:

Paper Pack |  Grateful Heart 12" x 12" (single sided)

Die-Cuts | My Favorite, Taste of Home, All the Feels, Floral Centerpiece

Stickers | Reflection Words (color)

Cut-Aparts | Tradition Labels

Flair | Snapshots

Journaling | Grateful Heart 3x4

You can find more of my work here: Instagram / Blog / Pinterest


Sunday, 4 July 2021

Favorite | Pretty Little Studio

Hello friends! A few days ago this brand new Pretty Little Studio collection "Grateful Heart" (by Claudia van Rooyen) arrived on my doorstep and I was so happy when I saw it in real life! Before, I thought the collection looked great on my computer, but when I had it in my hands it looked so much better! I totally adore the colors and the awesome designs! 

Here's the layout I made for Pretty Little Studio's blog:


This layout came together so incredibly easy and fast. I started with the beautiful paper called "Seasonal Wreath" and knew straight away which photo of my daughter I wanted to scrap with this paper. I printed a color version and a black & white version of the photo and matted the color photo. I placed the photos top left on the wreath and built my page from there. 


The photo was taken when my daughter was in Amsterdam book shopping, so an obvious choice was to use the die-cut of the little pile of books. And because books are among her favorite possessions the "favorite" die-cut was a logical choice too. 


I wrote a few lines of journaling above the pile of books. Next I adhered a little cluster of die-cuts  above the black & white photo:


And below the photo I placed one of the stickers with the stitches and on the black & white photo a little word sticker:


Last but not least I added my signature machine stitching. I used pink thread to stitch along the sides of the layout and white thread to stitch over the die-cuts.

Thank you so much for stopping by! Don't forget to visit the Pretty Little Studio shop for this collection or one of the many other collections. 

Here's a list of the PLS products I used:


You can find more of my work here: Instagram / Blog / Pinterest


Sunday, 27 June 2021

GO . SEE . DO | Step-by-Step My Creative Scrapbook

Hello friends! Today I'm sharing a step-by-step for my "Go.See.Do" layout created with the June Creative Kit from My Creative Scrapbook. I love all travel collections and was so happy to find that the June Creative kit featured the Time to Travel collection from PhotoPlayPaper! What I also adored in this kit was the stamp set from Jillibean Soup. I decided to create a page with this stamp set as the main feature. Here's what I made:

Here's how I created this page. I collected all the June kit items I might need to create this layout:

Next I got out my Distress Oxide ink pads and selected the camera stamp and got started: 


I thought I would use the colors of the rainbow: 


I started stamping in the top left corner and then downwards:


In no time at all my sheet of white cardstock was covered in cameras! 


Don't you just love the result?!


Next I matted my photo and chose a fun journaling card:


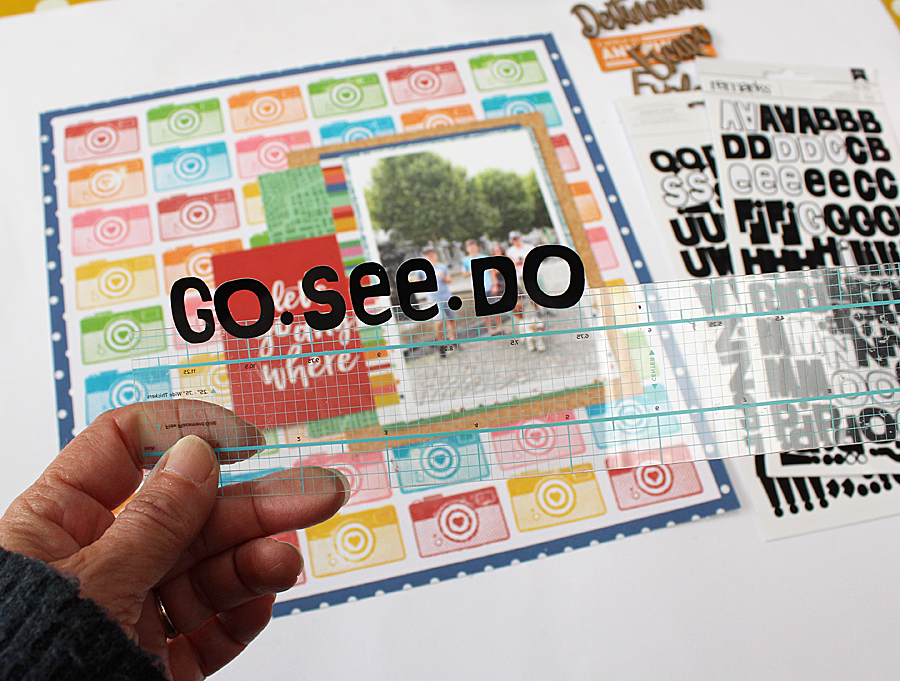
I used the black alpha stickers included in the kit to create a title. To decide where I wanted the title I adhered the letter stickers to a ruler first:


Also included in the kit were these wood veneer words. I colored mine with "Tattered Rose" Distress Oxide ink:


I adhered the wood veneer word on top of my photo and added a few die-cuts and stickers:


Last but not least I machine stitched around the page, over the title and on a few other spots:


And I was done! Hope you like it and I've been able to inspire you to give this stamp set a try too! 


Here are a two more detail photos; 


For more information about this kit (and the other 3 kits of this month) please visit the My Creative Scrapbook website and if you want to see the photos of all projects created by the design team with the various kits, please visit the Design Team Gallery.

Wishing you a wonderful day! 

xxx Monique


Sunday, 13 June 2021

Be You (step-by-step) | My Creative Scrapbook May Creative Kit

Hi friends! For My Creative Scapbook's blog I created a step-by-step for my "Be You" layout using their May Creative Kit. When I saw this kit I fell in love straight away! The Flower Garden collection from Carta Bella is so very beautiful, with it's soft colors and wonderful designs! 

I already knew which photo I wanted to scrap and I thought this collection was just what I was hoping for. In the photo you see my one-of-a-kind daughter, who is always up for silly and funny actions. Here she decided to act like she was cycling on the bike drawn on the tarmac (this indicates that this strip of road is a cycling path, of which there are many in the Netherlands!). 

As the photo was taken in April this Carta Bella spring collection was perfect! Here's what I created:

I started my page by displaying the items in the May Creative Kit (so beautiful!):

As I had already decided on a circular design with lots of flowers, I collected all the flower and leave punches I own:


And for the next quarter of an hour I happily punched a pile of flowers and leaves:


Using a round plate and pecil I drew a circle on a sheet of white cardstock and started arranging the flowers in a circle:


I started with the larger flowers, followed by the middle sized flowers and then the smallest flowers. I left an empty space where I wanted to place the photo:


When the circle with flowers was done I added the photo with a journaling card on the right side of it. I added a strip of paper below the photo and the journaling card and a chipboard die-cut with two flags on the left. A few lines of handwritten journaling and a few drops of paint and I was almost done:


Last but not least I machine stitched the flowers with two circular rows:


And now my layout was finished! Not a terribly complicated design, but the result is really fun. 

Here are a few more close-ups:


Thank you so much for stopping by! I hope I've been able to inspire you to create many pages with this kit! If you do, don't forget to share them with us! We have a special facebook page where you can show us what you've made, it's called My Creative Scrapbook Inspiration Central. Hope to see you there! 

For more information about this kit (and the other 3 kits of this month) please visit the My Creative Scrapbook website and if you want to see the photos of all projects created by the design team with the various kits, please visit the Design Team Gallery.

Wishing you a wonderful day! 

xxx Monique