Showing posts with label LYB. Show all posts

Sunday, 13 April 2014

Starbucks Love - Little Yellow Bicycle

Sharing a layout that was published in Scrapbook Magazine UK last July. The photos were taken in New York and the collection is one of my favs from Little Yellow Bicycle "Just Because". I also made a tutorial for the magazine about how to created those faux metal embellishments. Which is quite simple really.


When I started scrapbooking 10 years ago metal embellishments were quite the trend, but then they almost totally disappeared from the scene … only to return again now! I really love adding metal embellishments to my pages, but often I can’t find the right ones. The solution is simple: create your own (faux) metal embellishments using simple kitchen aluminium foil, chipboard shapes and an die-cut machine!

Kitchen foil can be quite fragile to use, but when you adhere it to a piece of chipboard you’ll have a nice sturdy base to work with. There are many chipboard shapes to choose from: small shapes like arrows, flowers, swirls etc. to add subtle embellishments to your scrapbook pages, or one large shape like a monogram to act as the main embellishment on your page. You can also use a large square or rectangle to act as the base for a card. The possibilities are endless! For my page I used star shaped chipboard as my page is about “Star”bucks.

Step by step:

1. Choose a chipboard shape and cut a piece of kitchen tinfoil a little bigger than the size of the chipboard. Carefully flatten your foil (I used a brayer).


2. Apply a thin layer of adhesive on your chipboard and decide which side of the aluminiumfoil you want to show on your page, the shiny side or the duller side. Place the sticky side of the chipboard on the side of the foil you don’t want to show on your page and carefully cut around the shape, leaving small strip of foil which you then fold around the edges.


3. Choose an embossing folder (I used one with a herring bone pattern) and place your chipboard shape inside. Roll through your die cut machine.


4. Now you’ll have created the perfect (faux) metal embellishment!


5. If you want to give your metal shape  a bit of color there’s one more step. Choose a solvent kind of ink that dries on non-pourous surfaces as you don’t want to end up with the color smeared over the rest of your page. I chose a StazOn ink pad as this is an ink that will dry on clear shiny surfaces in no time at all.


Materials: Little Yellow Bicycle (Just Because) patterned paper, cardstock stickers, journaling cards, clear cut shapes; American Crafts kraft cardstock; Maya Road chipboard shapes (Supernova);  Scraptastic Club stamps; Studio Calico wood veneer bubbles; Dymo word sticker; StazOn ink pad; Archival ink pad; K&Company Smash pen; Hema ribbon; V&D staples; Tim Holtz tiny staples; Bien Vu! kitchen foil; 
Tools: Sizzix Big Shot; Cuttlebug embossing folder; Silhouette Cameo; Tim Holtz Tiny Attacher and Brayer; V&D long-arm stapler; Aigger sewing machine. 


And here are a few tips:

Tip 1: To adhere your kitchen foil to the chipboard shape use adhesive not only on the topside of the shape, but also along the edges on the backside so the foil will stay neatly in place when folded to the back.

Tip 2: use a solvent ink to color your metal embellishment as that will dry very quickly and won’t rub off on your page.

Tip 3: instead of using StazOn ink pads to color your metal shapes, Ranger’s alcohol inks will work nicely too! Try using a q-tip to apply the ink.

Tip 4: When using small chipboard shapes choose an embossing folder with a “small” pattern/design like dots or herringbone.

This is it! Maybe you've seen it already in Scrapbook Magazine UK, but if not then I hope you like it!
Thanks for stopping by and hope to see you back soon!

Hugs,

Friday, 10 May 2013

Little Yellow Bicycle - NSD challenge

Hi everyone!

Enjoying your day off? If you live in The Netherlands that is ... or do you - non Dutchies - also have the day off, the day after Ascension Day? I spent my day off scrapping (of course) and chose Little Yellow Bicycle's NSD sketch challenge to work on.

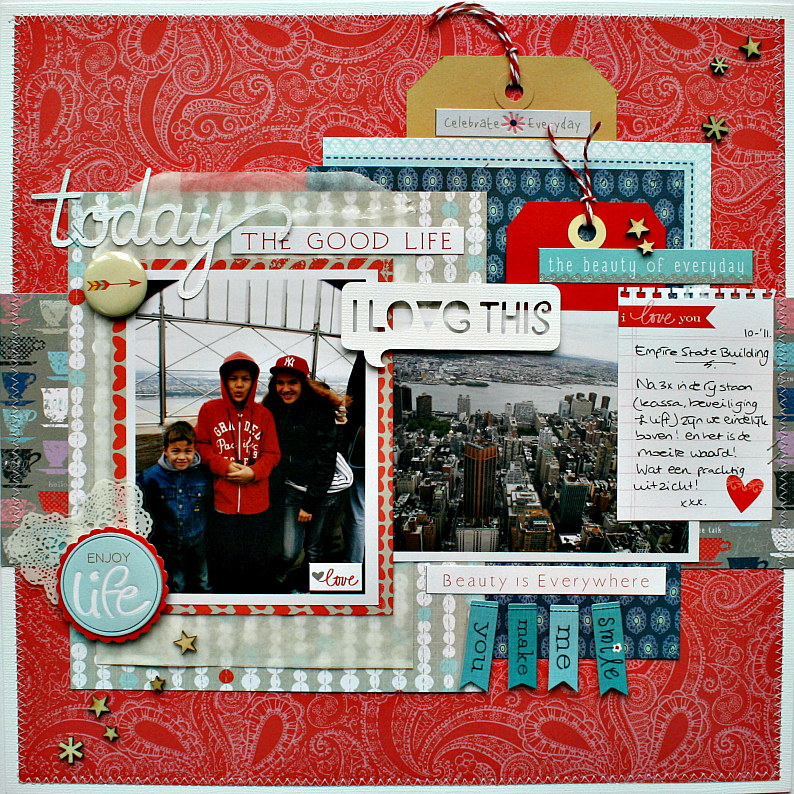
I've used their "Just Because" collection and chose some photos from our New York vacation where we were standing on top of the Empire State Building.


I've added a few Freckled Fawn wood veneer pieces, a flair button from American Crafts, two tags and a few cuts made with the Cameo.


and this is the sketch from LYB:
Don't you just LOVE this collection from LYB?!

Thanks for stopping by again today!
Hugs,

Monday, 1 April 2013

COFFEE layout

The April 1st challenge at Another Freaking Scrappy Challenge is up! This month the challenge is:

"Scrap about one of your greatest current challenges, or a challenge from your past."

I decided to scrap about the amount of coffee I've been drinking (way too much) and the fact that I reduced it by at least 50%. To be honest I let myself by inspired by this "coffee" collection from Little Yellow Bicycle "Just Because", I really love the paper with all the coffee cups and the cute transparencies. 


and a few close-ups:


The photo was taken when I was in the office. What you see is my handbag (on my desk) with me in the little mirror and my coffee cup behind my bag. 

If you've got a personal challenge you want to scrap about, please join us at Another Freaking Scrappy Challenge! or maybe hop over to have a look at the other layouts the dt members made. 

Thanks for stopping by again today! Hope you're having a fabulous Easter weekend! 
Hugs,

Tuesday, 4 December 2012

Day 11 of Little Yellow Bicycle's 12 Days of Christmas!

Yay! Finally I get to share the projects I created for Little Yellow Bicycle!!

We, the "Once Upon a Christmas" Cycling Team are doing the "12 Days of Christmas" and I was assigned Day 11. I've created 4 projects with the awesome "Once Upon a Christmas" collection; this collection is so so adorable, I just couldn't choose what to make and decided I would make as much as I could.

I started with this photo tray, a bargain I found at a local garden centre (Intratuin).


As soon as I saw the entire Once Upon a Christmas collection I knew I wanted to decorate a photo tray. The reason is the huge number of gorgeous embellishments that come with this collection. I just wanted to use them all and what is a better way than using them for a photo tray?! To create some depth I adhered photos and embellishments both in the tray and on the frame.


I used my Silhouette Cameo to create the snowflakes on the roof, the snowflake below and the word "Christmas" in the middle.


Once Upon a Christmas supplies:
- Poinsettia / Multi Starlight (OC-102)
- Holly Berry / Green Carols (OC-111)
- Merry Christmas / Red Damask (OC-110)
- Snowflake Plaid / Cream Houndstooth (OC-109)
- Mistletoe Stripe / Green Starlight (OC-105)
- Vintage Santa / Brown Houndstooth (OC-108)
- Snowflake Medallion / Red Houndstooth (OC-106)
- Journaling Cards (OC-134)
- Fabric Favorites (OC-220)
- Clear Cuts Shapes (OC-230)
- Tags & String (OC-132)
- Paper Crafting Kit (OC-305)
- Stick Pins (OC-277)
- Chipboard Shapes (OC-279)
- Cardstock Stickers Favorite Pieces (OC-135)
- Vellum Tape Strips (OC-160)
- Clear Stickers Cardmaking (OC-190)
- Cardstock Stickers Fresh Verse (OC-140) 

Then I created two layouts of which this is the first:
Two of my kids don't mind posing for me when I grab my camera, but the third always runs and hides! So, although the photo on the right isn't exactly perfect, it's very dear to me as it shows all of my kids happily decorating the tree! 


How I love all the embellishments, like the stick pins, the chipboard shapes and the transparant shapes!

Once Upon a Christmas supplies:
- Poinsettia / Multi Starlight (OC-102)
- Holly Berry / Green Carols (OC-111)
- Holly Bird / Brown Carols (OC-107)
- Clear Cuts Shapes (OC-230)
- Tags & String (OC-132)
- Paper Crafting Kit (OC-305)
- Stick Pins (OC-277)
- Chipboard Shapes (OC-279)

Then the second layout "Merry Christmas": For this layout I created a collage of some of the photos I made of all the ornaments hanging in our tree. We have this little tradition: when we go on vacation abroad we buy an ornament for our tree. For example: in this collage you'll see a cable car from San Francisco, a yellow cab from New York, the Eiffel Tour from Paris, etc. And then of course, we have a lot of handmade ornaments and I included a few of those as well. 


and a few close-ups:


Once Upon a Christmas supplies:
- Poinsettia / Multi Starlight (OC-102)
- Snowflake Plaid / Cream Houndstooth (OC-109)
- Vintage Santa / Brown Houndstooth (OC-108)
- Let it Snow / Green Medallion (OC-104)
- Journaling Cards (OC-134)
- Fabric Favorites (OC-220)
- Clear Cuts Shapes (OC-230)
- Tags & String (OC-132)
- Paper Crafting Kit (OC-305)
- Chipboard Shapes (OC-279)
- Vellum Tape Strips (OC-160)

Then last but not least, I created a card:


When I create cards I love to add lots of layers! With this card I started with the base, then added two different papers on top followed by a doily (my own stash), another piece of paper, a journaling card, a snowflake (cut with the Silhouette Cameo) and finally the tag with the sentiment. Add a little machine stitching and your card is finished!

Supplies:
- Snowflake Plaid / Cream Houndstooth (OC-109)
- Mistletoe Stripe / Green Starlight (OC-105)
- Vintage Santa / Brown Houndstooth (OC-108)
- Snowflake Medallion / Red Houndstooth (OC-106)
- Journaling Cards (OC-134)
- Fabric Favorites (OC-220)

And these were my projects! Hope you've enjoyed them!

Thank you so very much Little Yellow Bicycle, for having me on the Once Upon a Christmas Cycling Team! I had the best time ever!! 

Hugs,
Monique

Monday, 15 October 2012

I'm Cycling with LYB!!!


I got such a wondeful email from Liz Qualman this morning telling me I'm on LYB's Cycling Team for their "Once Upon a Christmas" collection!! See the anouncement HERE! (you'll find the details of their "Winterings" call there too, just saying :) ) HERE's the link to the entire collction. Fabulous right?

Doing a little happy dance right now!!

Hugs,
Monique

Monday, 30 July 2012

My first layout for AFSC!

The very first layout I created for "Another Freaking Scrappy Challenge" is a very bright and cheerful layout using photos from our holiday in Greece last year.

This is the sketch Anne sent the design team to work with:


and this is my layout:


I used the "Sweet Summertime" line from Little Yellow Bicycle, with some fun corrugated cardstock elements from Lily Bee, some Doodlebug twine, mini alpha stickers from My Little Shoebox and Thickers from American Crafts.

Some close-ups:


I really loved this first challenge for AFSC! If you want to see what the other dt members made, hop over to the AFSC blog. What I would love is for you to join us and create a layout with this fun sketch too!!

Thanks for stopping by and hope to see you back soon!

Btw, if you want to see some of our summer holiday photos then please come back tomorrow!

Hugs,
Monique

Friday, 20 January 2012

Almost Spring and a Birthday Party!

Ja, ja, 2 dagen zon en ik heb gelijk de lente in mijn hoofd! Ik had het voorjaarsboeket gemaakt die je in de vorige blogpost ziet, maar was nog lang niet klaar met de lente! Dus toen ik aan Astrids schets ging beginnen voor de Dutch Dares heb ik gauw foto's en papier gezocht voor een lente layout. Dit is het geworden:

Here in The Netherlands we've been having a few sunny (but cold) days and instantly it felt like Spring (well, it did to me!). So after finishing my Sping bouquet from the last blogpost I felt like scrapping a Sping layout! And here it is, a layout for the new Dutch Dares sketch:


Fotos van Tim (april/mei 2011) toen onze boom in de tuin in bloei stond met papier van Little Yellow Bicycle (Elizabeth Park). Helemaal blij word ik hiervan. Helaas is het weer inmiddels omgeslagen en regent en stormt het en lijkt de lente opeens verder weg dan ooit.

The photos are made last year May when our tree was in full bloom (isn't it beautiful?) and the papers are from Little Yellow Bicycle (Elizabeth Park).


Als je wilt zien hoe de schets eruit ziet of wat de anderen hebben gemaakt kijk dan even op het blog van de Dutch Dares! en waarom doe je niet een keertje mee met onze schetsen en dares? je kan hartstikke leuke prijzen winnen!!

If you want to see what the other designers did with the sketch, have a look at the Dutch Dares blog and maybe play along too??? You could be the winner of this month's fabulous RAK!!

Afgelopen woensdag hebben we Mats' (en zijn beste vriend) verjaardagsfeestje gevierd. We zijn naar de Uithof geweest waar ze zich konden uitleven op springkussen en konden racen op deze kleine motoren:

Last Wednesday my son (and his bff) celebrated his 7th birthday here in "De Uithof" and look what they did:


Ze vonden het supergaaf en Mats praat nog steeds nergens anders over!
They were all super excited and Mats is still talking about it (non stop!). 

En dan nog een Doodlebug nieuwtje....wist je dat je Doodlebug nu ook kunt vinden op PINTEREST??? Zo makkelijk! Alle projecten in 1x bij elkaar, klaar om te "repinnen", LOL! HIER is de link!!

And last but not least, did you know Doodlebug is now on PINTEREST too?? You can find them HERE! So cool, all the projects together ready to be "repinned", LOL!!


Dit was het voor vandaag! Fijne vrijdag en tot morgen ofzo!
This is it, have a fab Friday and see you soon!
 
Hugs,
Monique