Hi friends! Are still asking yourself whether or not to make a card for Valentine's Day? Here are a few examples of Valentine's cards which are really super easy and quick to make!
For Pebbles blog I created this the set of Valentine’s cards using the My Funny Valentine collection. I still find it much more fun to receive “real” cards in the mail than getting a quick text or email from someone. So, when I saw the fabulous die-cuts in the My Funny Valentine collection I knew what I wanted to do! And this is the result: a set of cards created with the awesome My Funny Valentine collection for the people who are dear to me:
These are the die-cuts in the collection that caught my eye immediately. Aren’t they terrific?!
I love all the die-cuts equally much and had a hard time choosing just a few!
The cards measure 4″x 4″ and consist of 5 layers and 1 die-cut:
For all five cards I embossed the pieces of white cardstock to give them some extra dimension. The top 4 layers were glued together and then machine stitched:
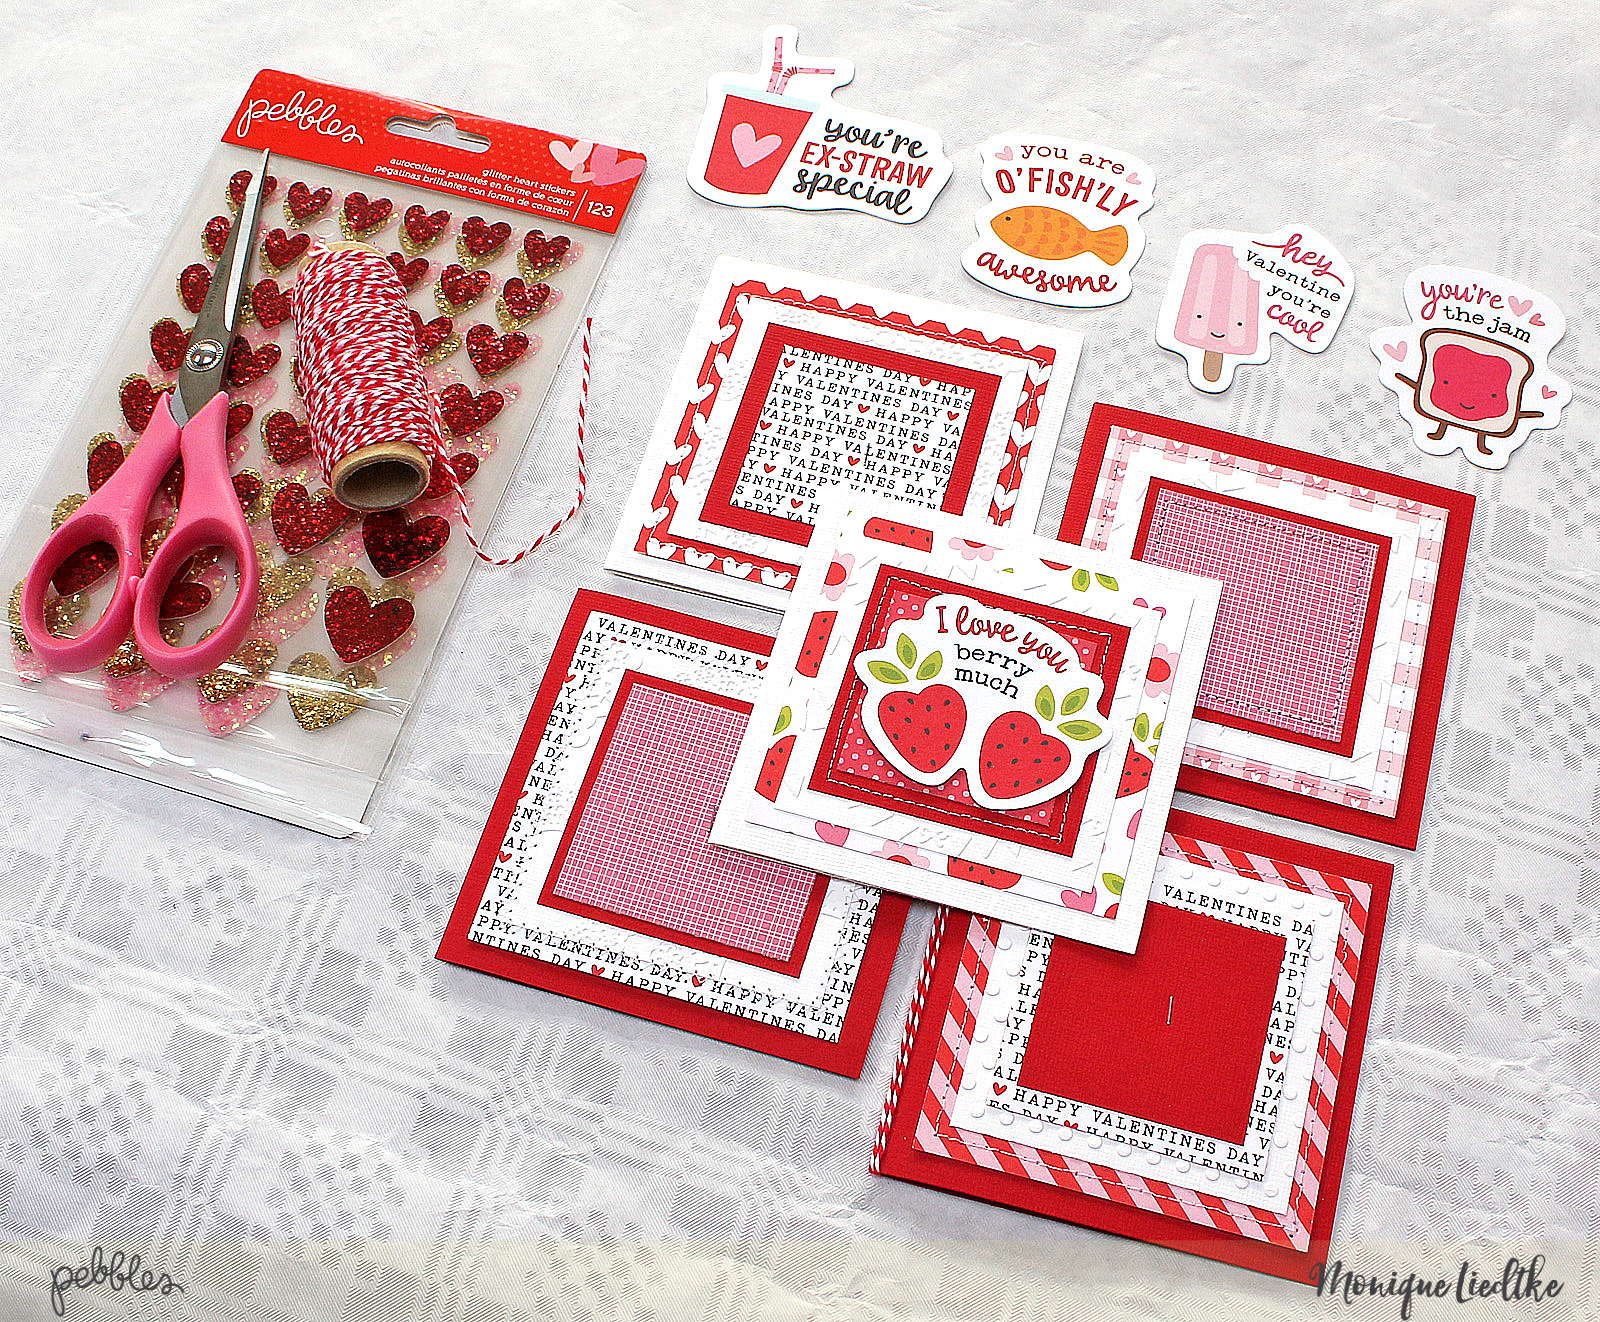
I wound a bit of twine around the spine and added a couple of those beautiful glitter hearts. The hearts are self adhesive and were easy to adhere on top of each other with the end of the twine in between:
And here you see the result. Don’t you think they look fun?
What I find great about the text on these die-cuts is that they are not necessarily only suitable for Valentine’s Day. You can easily send them for other occasions as well. I have lots of moments when I want to tell my sis, my kids or some of my friends that I find them awesome or special or … well this:
And of course there’s one for my husband as well:
Or maybe this one:
I know what I’ll do with the die-cuts I didn’t use just yet. I definitely need more cards!
How I love this collection!!
Supplies:
My Funny Valentine Ephemera Cardstock Die-Cuts (733273)
My Funny Valentine Glitter Stickers (733287)
My Funny Valentine Double-Sided Cardstock 12″x 12″ Pretty In Pink (733326)
My Funny Valentine Double-Sided Cardstock 12″x 12″ Candy Dots (733327)
My Funny Valentine Double-Sided Cardstock 12″x 12″ Happy Valentines (733328)
My Funny Valentine Double-Sided Cardstock 12″x 12″ Donut Sprinkles (733330)
My Funny Valentine Double-Sided Cardstock 12″x 12″ Fresh Strawberries (733335)
American Crafts Textured Cardstock Pack 12″x 12″ Primaries (AC712P12-47)
American Crafts This To That Double-Sided Super Sticky Red Tape, .25″ x 5 yd (61753)
American Crafts Cutup Scissors 7″ (64201)
Thank you so much for stopping by my blog! Wishing you a wonderful day!
xoxo
Monique
Friday, 10 February 2017
Thursday, 9 February 2017
I Love You Funny Valentine - The Cut Shoppe
Hello everyone! I thought I'd show you what I created for The Cut Shoppe using one of the new Valentine's cut files that were released recently! The Heart Day collection from Crate Paper had just arrived on my doorstep and was perfect for what I had in mind. I used a photo of my daughter and her partner and printed it in both color and b/w and created this page:
The cut file I used is this one: "Funny Valentine":
Here's a close-up of the fun cut file. I added a bit of machine stitching and a flair and a die-cut which I adhered on top:
Not only did I print my photos in both color and b/w, but I also printed them in a polaroid format:
You can find the "Funny Valentine" cut file in The Cut Shoppe Etsy store, and if you're looking for more love/Valentine's themed designs, then take a look under the Holidays section in the Shop.
Thank you so much for stopping by my blog today!
Wednesday, 8 February 2017
Happy Life - Like For Ever Kit Club
Hi, it's me again! I wanted to share the first layout I created with the February Beep Beep kit from "like for ever". I had so much fun playing with this kit! All the papers (Shimelle & Dear Lizzy) are so gorgeous, I really had trouble choosing the papers I was going to use for this first layout! My eyes kept going back to the Lil’ Bit Lovely paper (the one with the chevrons), so I decided to go with that one. What helped was that this paper matched the colours in my photo perfectly. I also used one of this month’s sketches (I’m a huge fan of sketches, so I want to use at least one of Laura Rumble’s awesome sketches every month!). Here’s what I created:
And this is the sketch I used:
I did make a few adjustments, like for example at the bottom of the layout … I really tried to keep the space “open”, but I just couldn’t do it, I had to fill it. I started by adding one of those tear strips that are added to all the sheets in this collection, but that wasn’t enough. In the end I used the part of the paper that I had cut off the top; I turned it around and adhered it right above the dark blue strip of paper. I tucked a bit of yellow patterned paper behind it as well, so it matched with what I had done at the top.
The photo I used was taken only last month. The kids were all wearing clothes in the same colour and didn’t even do this on purpose. I made them sit down and pose, which didn’t work of course. I took 20 photos and this was the best, lol. But I’m happy with it, especially because it matches this kit so well! I matted the photo on two pieces of patterned paper and added lots of die-cuts and stickers.
Here are a few close-ups:
The Dear Lizzy die-cuts in this kit are so cute, like that camera and the tag with the bike. Just adorable!
After a bit of machine stitching and a few drops of ink (not quite sure about those to be honest) I was done! Hope you like it.
Here's a photo of the wonderful February Beep Beep kit:
Thanks for stopping by to take a peek and wishing you a fab week!
xoxo
Monique
And this is the sketch I used:
I did make a few adjustments, like for example at the bottom of the layout … I really tried to keep the space “open”, but I just couldn’t do it, I had to fill it. I started by adding one of those tear strips that are added to all the sheets in this collection, but that wasn’t enough. In the end I used the part of the paper that I had cut off the top; I turned it around and adhered it right above the dark blue strip of paper. I tucked a bit of yellow patterned paper behind it as well, so it matched with what I had done at the top.
The photo I used was taken only last month. The kids were all wearing clothes in the same colour and didn’t even do this on purpose. I made them sit down and pose, which didn’t work of course. I took 20 photos and this was the best, lol. But I’m happy with it, especially because it matches this kit so well! I matted the photo on two pieces of patterned paper and added lots of die-cuts and stickers.
Here are a few close-ups:
ust adore those puffy icon stickers and would love to hoard them! But I realize that that would be a shame so I forced myself to use them. What I also love is that the Thickers come in two colours: in black and in white and you can choose which colour fits your page best.
After a bit of machine stitching and a few drops of ink (not quite sure about those to be honest) I was done! Hope you like it.
Here's a photo of the wonderful February Beep Beep kit:
BEEP BEEP | FEBRUARY 2017 KIT
£29.45 (Sold out)
Featuring Shimelle's Little By Little and Dear Lizzy's Oh Lovely Day collection, each kit includes:
Nine 12x12" double sided patterned papers | Three 12x12" Textured Cardstock (Limeade, Fireberry and Surf) | One pack Little by Little Magic Thickers | One pack Oh Lovely Day Ephemera | One pack Little by Little Enamel Dots | One pack Little by Little Puffy Stickers | One pack Oh Lovely Day Sticker Roll Tags
Thanks for stopping by to take a peek and wishing you a fab week!
xoxo
Monique
Wonderful (step-by-step) - My Creative Scrapbook February Kit
Hello friends! Today I thought I would share the second layout I created with the awesome February kit from My Creative Scrapbook. This time I chose this awesome patterned paper from 1Canoe2 for my background paper as the colors are soooo beautiful!
The photos were taken when three of my friends and I went (scrap)shopping and so we were in a very very good mood!
Here are a few close-ups:
I colored the Studio Calico wood veneers before using them on my page. And I just love the Heidi Swapp acetate words in this kit!
And just because, I thought I would do a quick step-by-step of this layout as it turned out as one of my favorites so far.
I started by cutting up the 1Canoe2 paper (Hazelwood collection, Forest Berry) and placing the four parts pointing outward:
Next I cut the journaling card "Wonderful" from the Simple Stories sheet (Posh collection) and matted it and placed it in the middle of my page with two small photos on the right:
I added two strips of patterned paper on the top and bottom of the wonderful card:
I added die-cuts, chipboard pieces, stickers and the acetate word:
Last but not least came the journaling, the paint drops and the machine stitching (which I hadn't done here just yet):
That's it! Easy right? Thank you so much for stopping by and if you want to take a look at this awesome and very versatile kit and the three other February kits, then hop over to the web site of My Creative Scrapbook!
Monique
The photos were taken when three of my friends and I went (scrap)shopping and so we were in a very very good mood!
Here are a few close-ups:
I colored the Studio Calico wood veneers before using them on my page. And I just love the Heidi Swapp acetate words in this kit!
And just because, I thought I would do a quick step-by-step of this layout as it turned out as one of my favorites so far.
I started by cutting up the 1Canoe2 paper (Hazelwood collection, Forest Berry) and placing the four parts pointing outward:
Next I cut the journaling card "Wonderful" from the Simple Stories sheet (Posh collection) and matted it and placed it in the middle of my page with two small photos on the right:
I added two strips of patterned paper on the top and bottom of the wonderful card:
I added die-cuts, chipboard pieces, stickers and the acetate word:
Last but not least came the journaling, the paint drops and the machine stitching (which I hadn't done here just yet):
That's it! Easy right? Thank you so much for stopping by and if you want to take a look at this awesome and very versatile kit and the three other February kits, then hop over to the web site of My Creative Scrapbook!
One more look at the February Main Kit:
Have a great day and hope to see you back soon!
xoxoMonique
Labels:
1Canoe2,
My Creative Scrapbook,
Simple Stories
Sunday, 5 February 2017
February Kit Reveal Day at My Creative Scrapbook!!
Have I told you I'll be (guest) designing for My Creative Scrapbook for the next couple of months?! I was so happy when Pam Rangel found me and asked me to join her design team!! Every month My Creative Scrapbook offers 4 kits: the Main Kit, the Creative Kit, the Album Kit and the Limited Edition Kit (for a closer look at all the kits hop over to the website). I've been asked to design with the Main Kit, which is my favorite kit!! Yay!
I'll show you my projects (4 so far) one project per blog post, but if you can't wait to see them all then please hop over to the MCS gallery, there you'll find all projects by all dt members.
A little while ago, Winston, the Carpe Diem mascot from Simple Stories came to visit me and I showed him around town. As the February Main Kit features Simple Stories I just had to scrap the photo of Winston and me. Here's what I made:
And a few close-ups: isn't Winston adorable?!
The hearts are the February cut files from My Creative Scrapbook.
And this is what the February Main Kit looks like: (soooo me!)
Thank you so much for stopping by and hope to see you soon! Have a fab Sunday!
xxx
Monique
Wednesday, 1 February 2017
Stuck?! Sketches February 1st Challenge!
It's the 1st of the month and that means there's a new sketch challenge waiting for you at Stuck?! Sketches! I used an older collection from Fancy Pants (Wonderful Day) and really like how this turned out. The photos were taken last year August when we went to Europe's largest book fair here in The Netherlands. It was the first time we went and we had such a great time! This year we'll be going again for sure!
And here's the sketch Laura Whitaker designed for us:
Here are a few close-ups of my page:
If you join us and create a layout based on the sketch you might win one of the prizes from one of our sponsor's:
Charm Creations are offering a $20.00 gift certificate to their online shop:
and
Cuts2Luv who are offering a $25.00 gift certificate to their online shop:
Also we want to show you how much we appreciate that you play along with us and share your designs and talent with us so we will be choosing one scrapbooker from each challenge to guest with us at a later date!
If you decide to play along then please link up your layouts over in the sidebar on Stuck?! Sketches' blog by February 28th 2017 at midnight EST to be in the running for one of our prizes! All prizes will be drawn randomly using Random.org to pick a number.
And if you would like to see what the other designers created with this sketch then please hop over to the Stuck?! blog as well!
I hope you'll give the sketch a try!
xxx
Monique
Subscribe to:
Posts (Atom)


